Decomposing Pumpkins

My kids think I am nuts sometimes! As we were carving our pumpkins last week, I asked my kids what experiment they wanted to do this year. Ah mom, not again!

Yes again! Several years ago I wrote my first blog post all about how teachers can do real world science with pumpkins! You see, I think it is great that around this time of the year our kids get to count the seeds, see if a pumpkin will sink or float, as well as getting to go to the pumpkin patch. But come on! We can do some really cool experiments with pumpkins. Scientists don’t just count seeds or see if they float or sink. They do something!

In my quest to make this whole pumpkin topic a little more scientific, I began doing experiments with our pumpkins! This year the experiment is trying to answer the following question: Does location (sun or shade) make a difference with regard to rate of decomposition.

Before I tell you about the data I have collected so far, let’s go over the experimental design. The variable I am changing deals with location while the variable I am observing deals with rate of decomposition (with regards to the “things” I see on a day-to-day/weekly basis-like production of mold or presence of bugs). Constants: both pumpkins came from the same place; both pumpkins are about the same size; and both pumpkins have the tops on during the day.

So here are the results after 1 week. IMG_0939IMG_0942The picture on the left is my son’s pumpkin which is in the sun for most of the afternoon. You can see the surface area is quite covered with mold already while my daughter’s pumpkin (in the shade) has very little. On day two, there were bugs in the candles-but not on the pumpkins. I am excited to see what next week brings!

Allowing children to make observations of pumpkins as they break down is a great way to engage them in the process of doing science. Designing the experiment is really about about coming up with a good variable to change!

So what experiment will you do this year? Here are some other ideas:

  • Does coating the pumpkin with something make it decompose faster or slower (so think about varnish, hairspray)
  • Does putting one pumpkin in the fridge at night slow down the decomposition process?
  • Will a pumpkin plant grow if you put dirt inside of it?

If you have a teacher friend who might like to do this with their kids, check out the lesson I developed! Just click here to find it.

Have fun with those decomposing pumpkins this year!

Launching Marshmallows!

S.T.E.M. (acronym for Science, Technology, Engineering, Mathematics) seems to be everywhere these days. From science conferences to school programs, everyone seems to be talking about it. Some in the educational world are even trying to write in engineering standards so students have to be taught this branch of science. Now, I am not opposed to students learning about it, but lets make it a natural part of the curriculum. Curriculums are already bursting at the seams with things students have to know and be able to do.

IMG_0910Take for example the S.T.E.M event I was a part last week (it was a great event done by Greenbrier Intermediate School in Chesapeake, Virginia). For two hours, parents and students had over 30 different sessions they could attend to learn about the different components to S.T.E.M. There was even a space for the other M-movement (they had a really cool rock wall my kids loved!). When parents and students came to my session, they might as well have stepped into a third grade classroom! In Virginia, the topic of simple machines is taught in 3rd grade. One of the goals is for students to learn about the six simple machines with the lever being one of them. The lesson I did with parents and students is a perfect example of how science and engineering can go together naturally.

The activity I did for the event was called “Launching Marshmallows.” Parents and students  followed a series of steps to build a launcher (aka-the catapult).  Then, they got the chance to try out their launcher to see if it worked. They were then given time to make modifications based on what they had learned from the first launch. After making modifications, they were again allowed to test out their launcher to see if the changes made any difference on how far their marshmallow flew!

In a matter of minutes, parents and students used their scientific observations and questions and became engineers!  An engineer is a problem solver who at various points in the project they are working on will design, calculate, organize, and communicate. Expert engineers are able to clearly define a problem and the constraints (such as time, materials, cost, etc.) that need to be solved to bring the solution to reality. But first and foremost, they are really great scientists!

In fact, there is a great deal of overlap between science and engineering. Some scientists design and construct things and there are engineers who also contribute to the pursuit of scientific discoveries.

Instead of adding on to our bulging curriculums, lets work with teachers to identify topics in our science curriculums that allow for natural integration of the design process used by engineers!

If you would like a copy of the steps for designing a catapult, just click on the contact page found at www.justsimplescience.com and I will share it with you!

Happy Designing!

Writing in Science

This coming Sunday  (October 20th) is  National Day on WritingYes there really is a national day on writing!  If you are interested, you can join Penny Kittle (@pennykittle) and Katherine Sokolowski (@katsok) on Sunday, October 20, at 8 p.m. ET, for a Twitter Chat (#nctechat) celebrating the National Day on Writing!

Must of us think of writing happening only when children get to elementary school, but even in preschool, children can begin to write! Writing for a young child often takes place in the form of scribbling. How many of us remember our own children doing this? I know I do!

At first I thought our daughter, who was three at the time, was just obsessed with notebooks. It seemed every store we went into, she wanted me to purchase a notebook. But soon I learned she just wanted a place to keep all of her ideas she had in her brain! She would scribble and scribble for hours it seemed. Of course when she brought me her notebook, she would ask me to read it for her. Not wanting to let her down, I simply told her that I had forgotten how to read scribble so would she mind helping me. I was amazed at the stories she would tell me from her “scribbling”!

Here is what the research says-when you see children scribbling, don’t disregard it! Just as we don’t discourage children from babbling; we should not discourage the scribbles. On the contrary, we should be encouraging them to write in whatever form it takes. As children continue to develop, they gain more fine motor coordination and the scribbling begins to take shapes. They will actually form lines on the paper like real sentences. We might think that when we see this we need to start teaching letter development. But not so fast!  Research has taught us that children attend to the whole written lines as opposed to learning how to do parts (whole to part learning). Only after they attend to the whole-written lines, do they start to pay attention to letters. (Temple, Nathan, & Burris, 1993).

IMG_0883

When we moved our daughter in preschool, we were lucky to find a provider who believed in early writing. From scribbles to actual stories, our daughter was learning how to write and communicate! In our family room, we have her very first published story! Entitled “Our Dog Abbey,” it is her story of our wonderful pet. Ms. PJ, her teacher at the time,  sat with our daughter and asked her to tell her about Abbey. Together, they created a cute and funny story. Even though she was only five, she was creative and insightful! Did you know that dogs wear collars to “keep the fuzzies from falling off?” Well our Abbey did! Our daughter even wrote about how she loved to put something over her nose to keep Abbey from barking so much (guess we used that muzzle just a little too much in those days)!

Drawings

For my son, scribbling never became lines of sentences. Instead, his scribbling turned into drawings.

Drawing can be a great first place to start when it comes to writing. Think about it, the first cave paintings held no words at all-just pictures! It is true what they say, a picture is worth a thousand words if it is done well. If you have ever read the book, Bunny Tales, you understand what I mean.

bunnycakes2Written by Rosemary Wells, the book tells the story of Max. When he goes to make his mother a birthday cake, he wants Red Hot Marshmallow Squirters for his cake. While his sister can simply write down what she needs to make her cake, he has yet to master the art of writing! So he draws pictures. Problem is, his drawings are not always clear. Only when he really thinks about his drawing, is he able to communicate what he wants.

Drawing is a great way for students to start writing down their ideas and to share what they are learning with their parents

Young Scientists Journal!

Several years ago I began volunteering with Bullfrogs and Butterflies, a local preschool, to do science activities and experiments with the students. As we were doing the activity or experiments, we would write for the children. Even thought we had done all these great experiences and had the children engaged, we found out they still went home and had nothing to share. If you have had children, you know what I am talking about. You pick your child up from school and ask “what did you do today?” and get the famous answer-nothing!

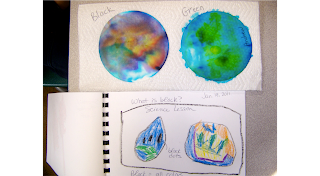
But we knew the children were learning and doing so much more than just nothing! To help the children tell their parents what they did that day, we made simple journals and began incorporating them into the day.  Students would do a science activity or experiment and then we had them journal what they observed. The basic set-up for the journal had the students draw a picture before and a picture after.

Here is a picture of a journal page from a lesson entitled “What is Black?”

After the children drew their pictures, we would go around and ask them to share what they learned or share with us what they drew. We then would write this information in their books. These simply journals became a tool the parents could use to engage their children in conversations about the learning that took place that day!

So how do you encourage writing in your classroom?

Science in the Library

Their excitement was contagious! Was it the simply act of putting on those really super stylish goggles or the fact they were getting ready to pop popcorn in a test tube that had their faces full of smiles? As an observer, both acts seemed to be equally as important and just being around them made me feel incredible honored to work with them. But what was really special about today’s lesson was working with a longtime friend who is a media specialist in Chesapeake City Public Schools. Yep-you read correctly, I said media specialist. See today’s science lesson took place in the school library.

IMG_0873After spending a week with me this summer, my friend Peggy approached me with the idea of doing science lessons in her library. We both agreed it was a fantastic idea! Why couldn’t the library not only be a place were children checked out great books, but also a place where they came to conduct research through hands-on experiences!

This week is her big kick off!  Third graders are exploring the question “How many books can an egg hold?” while fourth graders are studying the question “How does popcorn pop?” The 5th graders are exploring how various substances prevent an apple from decomposing.

So how does she make it work when library time in elementary usually lasts for 45 minutes? Simple. She has taken a lesson plan and chunked it into 4- 20 minutes sessions. Last week she opened the lesson by going through the experimental design process using rice krispies. Today’s lesson opened with reading a short passage from a book before popping some test tube popcorn. Next week students will get to design their own experiment to answer one of the questions they generated. During the last week, students will debrief and present their findings. All done in 20 minutes, one day a week for 4 weeks.

The key to making it work comes down to organization.  For the lesson today, she had all the materials in a pie pan and I took one group and she took another group of students. But everything was there. It was obvious she had talked to the students the week before and set some ground rules, because they knew exactly what to do and when. The cool part was we finished exactly in 20 minutes (discussion time and all) and the children still had time to find and check out their books!

What I loved most about today, besides getting to see the children’s faces when the popcorn actually popped, was to hear their excitement about the activity. One little girl spent five minutes telling Peggy the question she was going to explore with her mom when she got home! If you have any doubts about how a 20 minutes experience can get kids curious, check out the questions they raised from today:

  • What happens if you change the amount of oil used?
  • What happens if you use more than one candle?
  • What happens if you heat up the kernel before you pop it!

If we want our students to get excited enough to make science their career choice, then we have to engage them in experiences like the lesson today. Sadly, however, in many classrooms across America science is being squeezed out of the curriculum to make more time for reading and math instruction.

A study three years ago ranked American 15-year-olds 21st in science and 25th in math compared to peers worldwide.  President Obama called this bit of news “unacceptable” and challenged scientists and business leaders to find new ways to engage young people. If we are going to get serious about finding new ways to engage young people, then we have to remember this-

  • Engaging students has to begin in elementary school. Waiting until high school or even college to try to get students excited about science is really too late. By 5th grade, students have set ideas about career choices.
  • Engaging students does not begin with just reading a science textbook to find answers to the end of chapter questions.
  • Engaging students does not begin with flashy demonstrations that do little to teach children to persist when the research gets tough or does not come out like they planned it.
  • Engaging students does not begin with worksheets masquerading as a science experience.

Engaging students begins with–

  • The elementary teacher who understands vocabulary is built through context and experiences.
  • The teacher who throws away the worksheet in favor of allowing children to ask five people if they think a magnet can attract a paper clip through 10 paper plates and then using that experience to teach them how to visually show data using a graph.
  • The teacher who designs instruction so students begin to imagine themselves as a scientists because they see themselves doing science every day.
  • The administrator who understands science will be noisy because real scientists collaborate through discussions and arguments.
  • The understanding that through a science lesson, a child can learn vocabulary, learn how to find the mean, median, and mode in order to analyze data and then write about it; as well as learn to read through books filled with science ideas and facts.

I believe there is still hope for our students and for the thousands of budding scientists that enter our schools everyday. But it will take more teachers like Peggy who refuse to give up and give in to what is easy. Teachers like Peggy, who choose instead to take a different path that is a little harder and more challenging in order to do what is right for children. Thanks to Peggy and test tube popcorn, budding scientists were reborn today! I can’t wait to see what they do next!


Magical Science or Art?

Floating Flowers!

Imagine the scene: you walk into a huge ballroom with decorations everywhere. On the tables are these beautiful, tall vases containing flowers that seem to be floating. Wait a minute? Flowers can’t be suspended in water? How did they do it?

Of course, those of you who know me really well know what I did next. Yep-in my best party shoes, I climbed up on the table to reach the vases. Now, just so you know, I did speak with the ladies who were at my table. You see they really wanted to know how the arrangements were made as well. I just could not let them down now could I?

Unfortunatly, being vertically challenged, reaching the center of a 10 foot circular table was a little harder than I had anticipated. But, I managed to do it and keep in mind, one must do these crazy things in the pursuit of scientific discovery!

And presto! Mystery solved!

How did they create an arrangement of floating flowers? Drum roll please….with Water Gels! Yep-tiny little crystals that are made of a chemical that when placed in water swell to almost three times their size. Let me just say these little crystals are amazing! Not only do they “magically disappear” when placed in water, but you can use them for a variety of purposes.

Water Gels can be found at Walmart in the floral section, in any florist shop, or on the web.  Just click here to order some!

The super absorbent polymer in water gel crystals has many uses. One of the great uses is in landscaping and agriculture to help retain soil water in dry climates. That’s right-just put these little things under your plants and when it rains, they fill up with water and help to water your plants!

These water gel crystals are a cross-linked acrylamide and potassium polyacrylate co-polymer. It is non-toxic but should be handled carefully as with all chemicals. Just be careful! When these guys get filled with water, they become extremely slippery.

So how did I make the great floral design above?

  1. First you hydrate the crystals. Takes about 24-48 hours.
  2. Next, you layer some of the crystals in a vase.
  3. Then you lay your flowers in at various angles.
  4. Fill in with some more of the crystals.
  5. Then slowly add water.

Here are some pictures of the process:

DSC_0440

Need a vase and your water gels


Need some flowers. We picked these from the yard.

Need some flowers. We picked these from the yard.


Begin adding water gels into vase.

Begin adding water gels into vase.


Then add flowers in various positions.

Then add flowers in various positions.


Then just add water and suddenly the flower seems to be floating! The water gels in this shot had not finished absorbing water which is why you can still see them!

Then just add water and suddenly the flower seems to be floating! The water gels in this shot had not finished absorbing water which is why you can still see them


Just be careful using flowers that have dye in them. They will bleed over to the crystals.


Here is a video to show you how to make one. Just click here.

What is the science behind why these little crystals seem to magically disappear in water? Here is the simple answer: refraction. Put a pencil in water. What do you observe? Does it look bent? If so, that is due to refraction. See light can’t travel as fast in water as it does in the air. The difference in speed causes the image to appear to bend a bit.

But in the case of the flowers, because the gels are filled with water, the refraction is reduced and they seem to disappear in the water!  Pretty cool huh! Try this out for your next party and have fun watching your guests be blinded by science!IMG_0334

Go Science!

Fantastic Egg Experimental Design!

IMG_0854Higher and higher the stack went. It was getting so high, I was not sure I would be able to reach up to put any more books on the pile!

As all of this was unfolding in Ms. Bussey’s Kindergarten classroom, I was trying to figure out what went wrong. Just 5 minutes ago I was in Ms. Williams’ 1st grade classroom and the egg broke at 32 books. Why was it different this time?

Finally at 55 books, we made the choice to stop before the leaning tower of reading books came toppling down! Of course our failure to crack the egg did not matter to those kindergarten students. They were simply amazed at the wonder of science and the fact our egg, that tiny little white oval egg, was holding up all of those books!

Getting students to do authentic science is not hard. It just means stepping out of your comfort zone and doing something different. Stacking books on an egg might seem like a weird activity to do, but it is a really simply way to (1) engage students in the process of doing science and (2) integrate skills across the curriculum without even knowing it!

Modeling the Process of Science

In the egg activity, students began by making observations of a raw egg based off what they saw with their eyes. Students generated words that described the egg’s shape, size, color, and the texture. Hmmm, this sounds like a language arts activity doesn’t it!

IMG_0849

Next, they were given the question “How many books will an egg hold while it is sitting on its side?” One by one, each student got up and took turns adding a book on top of a pan that was resting on the egg and three other supports. Higher and higher the pile climbed until book number 32 was placed on the stack! Crack! The egg failed.

Results: the egg resting on its side held 31 books before it cracked at 32.

Inquiry is a Natural Process

Inquiry. What does it really mean? Simply put, inquiry is just the process of finding an answer to a question through observations and/or experiences. Learning to inquire comes from fostering curiosity. When students are curious, they naturally ask questions. Asking questions can lead to research! And eventually, scientifically oriented research!

Designing an Experiment

Next, we worked together to design an experiment. To do this we used the 4 question strategy. As I explained to the students, what we just did was an activity (putting books on an egg) that allowed us to learn something new and gave use the opportunity to make observations. We learned that an egg, resting on a clay base on top of a table, could hold up to 31 books before breaking. In order to do an experiment,  we had to change something about our setup to see if it would make a difference.

IMG_0847

Using the materials from our first activity, we brainstormed how we could change those materials in such a way that might affect the egg breaking. Even after only 4 weeks in school, these 1st graders were masters at brainstorming. They generated ideas like changing the position of the book as it was placed on the pan; changing the position of the egg from resting on its side to standing straight up, and many more!

Together we agreed to not use clay to support the egg during the experiment. During our first activity, one of the students made the observation that maybe the clay was actually supporting the egg. Hmmmm, this was pretty cool! So we went with this idea. Would not using any clay at all make a difference in how many books the egg held before it broke?

Natural Integration

In both classrooms, students used numbers to count how many books an egg would hold. As the kindergarteners counted, the teacher looked over at me and said “this is perfect, we are reviewing our numbers and counting. You know, practicing counting is better when they have a purpose for doing it!” Integration should not be a force fit. If the standards say children need to learn how to count to 50 or 100, then why shouldn’t they count actual objects?

Outcome of our Experiment in 1st Grade and Kindergarten?

Remember now, with the clay base under the egg, it was able to hold 31 books! So one by one, those 1st grade students came up and stacked the books. 9. That was the magic number this time. We made it to 8 books and when the 9th book was added-crack!! The kids went wild!! What did we learn? In the words of a wise 1st grader-“Dr. Flannagan, that clay was making it easier for that egg to hold those books!”

In Kindergarten, the students got to 13 books before breaking when the 14th books was placed on the stack.

Of course the difference between the classrooms intrigued me. Was it the cart? Did the rubber mat along with the clay base really provide that much support that an egg was able to hold up to 55 books without showing the slightest bit of strain? And why were we able to get to 13 books when the clay base was taken away? So many questions; so little time!!!

Sadly, I don’t think Ms. Williams is going to get anything done the rest of the week. As I left the Ms. Bussey’s Kindergarten classroom, I just had to go back to the first grade to share the unusual results we got. This of course just got them thinking and asking more questions! So while Ms. Williams may have to adjust her plans, I can’t wait to hear all about the experiments her students conduct! Big shout out to both Ms. Williams and Ms. Bussey at Fairfield Elementary School in Virginia Beach for allowing me to come and do science with their students!

If you would like to teach this lesson to your students, simple click here to purchase a copy of the lesson! I would love to hear about the experiments your students design!


It is said the eyes are the windows to the soul. If this is true, then science runs in the blood of students in Ms. Williams and Ms. Bussey’s class in Fairfield Elementary School in Virginia Beach. Not only were their students excited and engaged, but they were thinking scientifically!

Introducing Just Simple Science!

Over the years I can’t tell you the number of teachers and friends who have told me-“You need to get your stuff out there Jenny Sue! You have some neat ideas, share with us please!”

After much thought and prayer, I decided to just do it! Let me welcome you to the NEW Just Simple Science.  I have been consulting for a couple of years, but did not have a website that really looked professional. So, I started looking into redesigning my word press site and here it is. There are a few glitches I need to learn how to fix (like the tiny little flasks on the home page that are supposed to move in and out with the pictures), but for right now, I am just glad to have everything in one spot. Please take a look around and use the contact page at the end to tell me what you like and what I need to add or change! Be sure to click on the RSS feed symbol when you get to the home page so you will get my blog updates! To go to the home page, click here.

Go Science!


Science of the Loofah!

No, this post is not going to be about bathing-well yes it is. But not in the way you might be thinking. What I love about science is this-you can find it everywhere!  How many of you out there have bought a loofah before? I have to admit I have several and love using them! But do you know where the inspiration for our plastic loofah’s come from? 

Nature!

That is right. The idea behind those plastic loofahs that cost you 2$ originally came from a plant. My friend Anne called me the other day to tell me about her latest adventure–growing loofahs. Hmm-growing loofahs! And the questions began: where do they come from and how did they fit into the whole bath experience. 

Let me just say thanks to  my guest blogger Anne for inspiring this post and sharing how she grew loofahs this summer!

In Search of the Loofah!

I turned to the Internet to answer some of my most basic questions about bathing and the loofah. Here is what I learned:

Why were People so Against Bathing?

Thanks to the Black Plaque in the 14th century, people did not bath much. According to doctors, the warm water opened up your pores and allowed diseases to enter. This trend continued until the 19th century when doctors felt that keeping the pores open was a better solution.

When did Bathing Really Start?

In the late 1800’s thanks to a little book called “Baths and How to Take Them.” You can see a copy of it here. Thankfully the book told everyone how long to stay in the water, what temperature the water should be, and of course when you should not get in the water!

 Because most American’s did not have indoor plumbing, the bucket and sponge substituted for the modern day bathroom! Enter the Loofah! It was a great tool to use.

What is the Luffa or Loofah? 

The Luffa belongs to the same family as squashes and cucumbers. Scientifically, they are from the genus Luffa. They have large yellow flowers, a vining growth habit, and fruit that roughly resembles a zucchini or cucumber.

Here is how my friend Anne, from Pungo Couture, grew hers this summer:

These things love to climb! I simply planted them near my kids swing set and wham! They took off!

Image 12 To plant your very own loofah’s, this is all you need to do:

Sow seeds between two wet paper towels on a plate – keep in the sun and keep plate wet for about a week until the seeds sprout

Plant in soil close to the base of your swing set or fence when school gets out

Enjoy the pretty yellow flowers all summer long!  Full sun makes loofah very happy

When school starts, you can begin to harvest your loofahs

How do you harvest your Loofah?

Get mom to buy a dollar store or inexpensive serrated bread knife

Image 5

Slice vertically to open the skin and take your thumbs and push the loofah skin off

Image 6

Wash all the loofah plant goo in a bucket of water

 Image 1

Dry outside for a week or more in a sunny spot turning to make sure all moisture is gone

Slice with the serrated knife into sections

Image 4

 So what can you use them for? Well you can use them to clean pots and pans; or exfoliate in the shower! Other cultures use the loofah to make soups. Check out this recipe here.

Making Loofah Soap!

This is an easy project you can do with your kids once you have grown your loofah!

Here are the materials you need:


  • Knife
  • Loofah
  • Wax Paper
  • Small Tin
  • Ready-Melt-Soap (click here to purchase some or here)
  • Double Boiler or Microwave

Steps:

  1. Cut a half slice of loofah using a bread knife.
  2. Place slice in the tart tin with cups lined with wax paper.
  3. Melt ready-melt-sop in the top of double boiler or in the microwave.
  4. Pour enough soap into tart tin until the slice is covered.
  5. Wait for soap to completely harden before popping out of tin

Even ducks like Loofah!

Image

 Who needs to purchase these things from a store when you can turn to science! What other things do you do that connects to science? Go Science!

Back to School

I can’t believe another summer has gone and the kids are off to school. With the beginning of school comes a time to do things differently, to jazz up what we did the year before, and to inspire another group of students!

And the winner is…

Last week I did my first ever drawing and I have to give a big shout out out to Karen M. who won the Magnificent Magnifying Lens and activity pack! Can’t wait to see pictures of her girls doing some science! Thanks to all who entered!

Cool Resources for 2013-2014!

With all the teachers heading back, I wanted to share a couple of links I found from a friend. These are some great resources and they are FREE! That is right-free. So go check them out!

This site offers free lesson plans. All you do is sign up. Most of the resources have power points and other pre-created items you would need to teach the lesson!

Apps for the Classroom

Who doesn’t love those little apps!  Developed by Cyndie Sebourn, there are over 20+ apps ranging from reading strategies to math. Most of them are very inexpensive to purchase but the best part is you get the curriculum for free! Go check it out!

Lesson Pathways

For all my elementary friends-this is your site! It has a ton of lesson plans but I have to admit- it does take some time to go through all the lessons. Most of them seem to be linked to a website or a sample lesson. For example, I looked up scientist activities and found my way to the family education website where it had a lesson on evaporation and how scientists do their work. Might be good for a rainy day when you have time to explore.

Media Education Lab

This is a great site for those looking to integrate multimedia curriculum resources in the classroom. I personally found the site to be full of great ideas and support. For example, I clicked on a tab called Copyright and found lesson plans, power point, and other tools to teach students the importance of paying attention to copyright laws.

Let me know your thoughts on these resources! Hope you all have a fantastic Back-to-School week!

Connecting Science and History!

It is the middle of a hot week here in Virginia and I have been teaching a week-long workshop on Physical Science. So blessed to have 27 amazing elementary teachers playing, debriefing, and playing some more this week with me!  Take a look at some of the pictures and see if you can identify a common theme among them:


If you said the teachers look like they are having fun learning; you would be right!  But these pictures actually show two activities that connect to topics found in the Virginia Social Studies Standards of Learning.  

Making Water Flow Up!

Let’s start with the fountain. Yes, we made a fountain in the classroom and did not make a mess! The history of the fountain can be traced back to Ancient Rome. Using a system of aqueducts, cisterns, and the force of gravity, Ancient Rome was able to received and store water. Gravity helped to move the water and cisterns, which are similar to what we know as water towers today, helped to store the water.  

Water flowed from the cisterns either through pipes to individual houses or to public distribution points. Fountains were not only decorative; but functional. People could bring their buckets to the fountain to collect water. Some of the fountains had elaborate sprays. These were due in part to the height of the cisterns.

Turtle Fountain in Rome

Our fountain works off of air pressure. On top of the bottle is a balloon filled with air. Once released, the air rushes into the bottle and begins to force the water out through the straw. Even though the straw is pointed up, the pressure is great enough to make the water flow up and out of the straw! Keep reading for directions on how to make this easy, yet fun water fountain that will have your students or children shouting-“Can we do this again?”

Learning about Ancient Rome (grade 3) and the importance of aqueducts and fountains!

Sometimes Accidents in Science Create Fun 

In 1940, Franklin Roosevelt called rubber a “strategic and critical material.” When our military success in the war became dependent on rubber production, the US government asked companies to invent a synthetic rubber that could be made with non-restricted materials. Scientist James Wright quickly began experimenting with various materials in his quest to discover synthetic rubber. 


The now famous goo, known as Silly Putty, was accidentally created through the combining of boric acid and silicone oil. Tests on the “new goo” done by Wright concluded it could bounce, stretch farther than regular rubber, did not mold, and had a high melting temperature. Unfortunately, it did not have the properties necessary to replace rubber. Originally called “nutty putty,” the substance was a lot of fun to many people. After a series of events, it eventually made its way into the toy market and the rest is history!

Science is just plain fun at times!


Even though our Silly Putty is made from items you can find in Wal-Mart, we still had a great time exploring chemical changes! 

If you would like to have some fun this weekend, here is what you need:

Water Fountain 

  • 2 liter bottle
  • Straw
  • Blue Tac or Modeling Clay
  • Water

Directions:

Get ready for some fun!
  1. With a pen or a pair of scissors, poke a hole in the empty bottle just big enough for a straw to fit through.
  2. Seal the straw with Blue Tac or Modeling Clay.
  3. Pour water into the bottle over the level of the hole (we put the hole down lower on the bottle).
  4. Plug any leaks by squishing down the clay and make sure the straw is pointing up!
  5. Blow up the balloon, twist it slightly, and then put over the opening of the bottle. Let it untwist and get ready!

Silly Putty 

To make silly putty, you need the following items:

  1. 1 4 oz bottle of glue
  2. 1/4 cup of  StaFlo starch

Pour these materials into a quart sized bag, seal, and mix together.

When the solid begins to form, open the bag and continue to knead inside the bag. Eventually you will be able to pull it out of the bag and have fun!

What other connections can you find between history and science? Just remember, science rocks!